top of page


Epoxy Flooring
Benefits
-
Hygienic - It provides a jointless epoxy flooring making it dust free & easy to clean
-
Chemical resistance - It has excellent chemical resistance to most chemicals
-
Wear resistance - It provides a tough floor topping to withstand foot & light vehicular traffic
-
Good abrasion resistance & good UV stability
Where it is used?
-
Staroxy (Epoxy) HG is recommended for use where extremely hygienic, abrasion, chemical resistant and dust free environment is required. It is ideally suited for flooring in following industries.
-
Pharmaceutical Industries
-
Electronic Assembly Areas
-
Clean Rooms
-
Food Processing Industries
Scope Of Work
-
Surface preparing by removing of dust, oil, grease, unwanted cements etc. through heavy duty grinding machine for exposing the micro pores on concrete.
-
Filling of control joints, holes and uneven surface through epoxy mortar
-
Applying of Staroxy Primer let it cure for 8 hrs.
-
Application of Staroxy UL (Self Levelling Screed).
-
Applying of Staroxy SL as per recommended thickness and let it cure for 36 hrs. (for optimum result)
Surface Preparation
-
Suitable methods are sanding or grinding. Any surfaces that have been contaminated with oils may also require chemical cleaning.
-
Use an industrial vacuum that picks up even small dust particles. The floor must be cleaned of all dusts and residues before starting to prime. Otherwise you will have various particles trapped within the coat and adhesion will be significantly weakened. The less micro-dust on the surface the less primer you will need.
-
For thin cracks it may be necessary to slice them with a cutter before filling in order to improve the anchoring of the grout.

Primer - Staroxy 103 MOT
-
Mix Part A and Part B of Staroxy 103 MOT with Electric Stirrer. Once parts A & B have been thoroughly mixed, the product may be thinned to aid application.
-
Apply the primer coat by brush and then roll the centre with a short nap roller.
-
Allow a drying time of at least 4 hours before applying basecoat. If you intend to install epoxy corner coving, this should be done before commencing the next step.

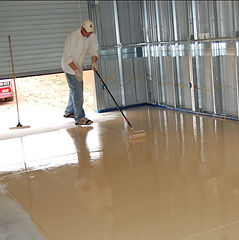
Basecoat - Staroxy UL 1000
-
The base coat used is usually Staroxy UL. Mix Part A and Part B of the Staroxy UL in a clean bucket with Electric Stirrer according to the instructions on the technical data sheet.
-
Starting at the far corner, apply the basecoat by trowel and roller and evenly broadcast the Sand if necessary, into the wet product until all the basecoat is covered, except at the leading edge.
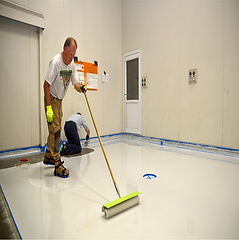
Roller Topcoat - Staroxy SL 300/500
-
Once ready to apply topcoat (waiting overnight for the basecoat to efficiently cure), mix Part A and Part B together.
-
Refer to 'Mixing Section' of this product data sheet. Continue mixing throughout application. Be sure to roll one even coat of Staroxy SL 300 topcoat to entire surface to be coated.

Other Useful Products

-
Staroxy 20 SF – Sand Coving
-
Aggregates – Sand, Silica Powder, Talc Powder
-
Staroxy 21 WB – Water base Coving
-
Stancrete 33 PU – PU base Coving
-
Stanrocove 25 – Covefinish
-
Staroxy 22 – Epoxy Coving Paint
-
Starothane 23 – PU Coving Paint
-
Starothane Yellow/White – PU Yellow Lining Paint
-
Staroxy Yellow/White – Epoxy Yellow Lining Paint


bottom of page